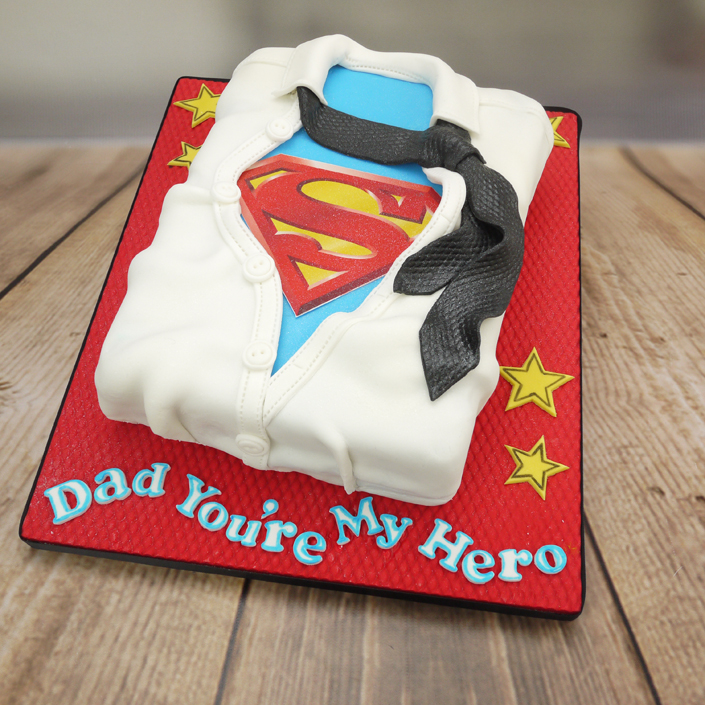
This Father’s Day, why not make your Dad this awesome Superman cake, using the Superman logo edible printed cake topper. It’s quirky, fun and so much easier than it looks. It’s perfect for birthdays too!
We Used
Edibles
- 750g Madeira cake mix
- 750g Sattina Meditteranean blue sugarpaste
- 500g Sattina white sugarpaste
- 250g Sattina true red sugarpaste
- Superman Logo edible printed cake topper
- 100g Sattina pitch black sugarpaste
- Edible glue
- Black edible ink pen
- Sea blue ‘brush N fine’ pen
- Cornflour pouch
Equipment
- 8″ square tin
- 16″ non stick rolling pin
- PME curved edge icing smoother
- Fish scales embossing sheet
- 10″ x 12″ rectangular cake boards
- Scissors
- PME plunger circle cutter
- PME designer wheel
- Fmm ribbon cutter
- FMM set of 4 stars cutter
- Cake Star mini alphabet push easy cutters
Baking The Cake
We used an 8″ square cake tin with 750g of Sattina Madeira cake mix and cut 2″ off one side, to create an 8″ x 6″ cake. If you have never used the Sattina Madeira cake mix before – it’s delicious and easy to use as you just add water, mix and bake!
Step One: Covering The Cake

Place the cake on a spare cake board or chopping board. Slice the cake and fill with your favourite jam and frosting then smooth a layer of frosting over the top and sides of the cake. Knead approximately 750g of blue sugarpaste until smooth and pliable then roll out on a work surface sprinkled with icing sugar large enough to cover the cake. Lift onto the cake, smooth the top over first using a cake smoother then around the corners and down the sides using the palms of your hands. Smooth over again with the cake smoother and cut away the excess icing around the edge of the board.
Step Two: Decorating The Cake Board


Brush a little edible glue or cooled boiled water over the cake board then roll out approximately 250g of red sugarpaste and lift onto the board. Position the embossing sheet onto the icing and press down firmly using your hands or a cake smoother so that the pattern is embossed into the icing. Lift the sheet off and use a sharp knife to cut any excess icing away around the edge of the board.
Step Three: Cutting Out The Superman Logo

Take the Superman printed logo out of the packaging, peel the back away and cut carefully around the outside edge with a sharp pair of scissors.
Step Four: Attaching The Logo & Creating Creases In The Shirt

Attach the Superman logo onto the centre of the cake with a little edible glue then roll a few sausage shapes out of blue icing and position them around the edge of the cake – these will help create creases in the shirt.
Step Five: Adding The Shirt


 Roll out enough white sugarpaste to cover one side of the cake and attach loosely with edible glue so that the icing sits around the Superman logo and folds into small creases. Repeat on the other side then roll out and cut two narrow strips of icing using the multi ribbon cutter tool marking two lines of stitching along the edges using the PME designer wheel. Attach each strip to the shirt and add a row of buttons cut out using the PME circle plunger cutters using a cocktail stick to mark the buttonholes.
Step Six: Making The Tie

Roll out some black icing, lay over the fish scales embossing sheet and press down firmly to create the pattern on the icing. Cut several long strips to create the tie and attach, firstly around the neck, then two lengths down the shirt, shaping each end to a point. Finish by wrapping a shorter length around the tie at the neck to create the tie’s knot. To add the collar, roll out a little more white icing, cut into a strip, mark some stitching around the edges and attach over the tie.
Step Seven: Finishing Touches
Carefully move the cake onto the cake board, attaching with some royal icing or frosting. Cut out some yellow stars and add a message cut out using the Cake Star mini alphabet push easy cutters. If you have time, leave the stars and letters to dry for an hour before decorating. Use a black edible ink pen to draw a line around the stars and the blue ‘brush N fine’ pen to outline the letters. Attach to the board with edible glue and finish by attaching 15mm black ribbon around the edge of the cake board with double sided tape.
Handy Tips
When rolling out icing for decorations (not covering the cake), use a cornflour pouch instead of icing sugar as this will give you a fine dusting that will prevent the icing from sticking to your work surface and hands!