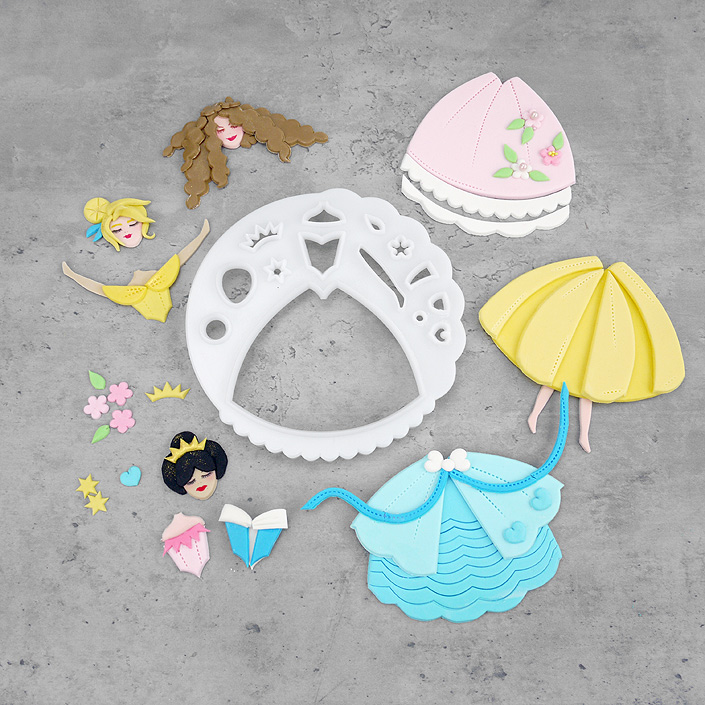
This fun cutter allows you to easily cut out and create a range of princesses to decorate your cakes and bakes, you can even make matching princess cupcakes using the head and smaller shapes! The scalloped outside edge can be used to create a frill on the dress or around the outside of the cake while the flower, star, heart and bow shapes can be used to decorate your princess topper, cake and cupcakes.
There are lots of places to get inspiration from, or you can design your own princess. It helps to have an idea of the colours and design you want to use before you start, then get creating, you’ll need to use a little edible glue or water to attach the icing pieces to each other and onto the cake.
For Our Designs, We Used:
Equipment
FMM princess cake topper cutter
Small non-stick rolling pin
PME Quilting Tool
Edibles
Cornflour pouch
Edible glue
Sugarflair paste food colourings
White sugarpaste or
White modelling paste
Optional to decorate – magic sparkles, mini pearl sprinkles.
Cut Out The Skirt
Dust your work surface using cornflour or icing sugar and roll out some icing in the colour of your choice. Roll out the icing to between 2-4mm and cut out the two outside edges of the skirt using the plain curve of your cutter then cut the bottom of the skirt using the plain or one of the scalloped edges depending on your design.
Handy Tips
The Icing – you can use sugarpaste (fondant) to make the princess, but modelling icings are firmer, can be rolled out thinner and is a little easier to handle.
Colours – you can use ready-made, coloured icings or colour white icing yourself. Use paste food colourings instead of liquid, they are concentrated and do not change the consistency of the icing.
.Ways To Embellish The Skirt
Layered panels – cut out using the large, scalloped edge of the cutter and divide into four. Add detail with a quilting tool and icing blossoms cut out using the small flower cutter topped with mini pearl sprinkles.

Over-skirt – cut out using the plain and curved edge of the cutter. Add ‘seams’ with a quilting tool and icing decorations cut out using the small heart cutter (join 2 hearts together with a little ball of paste to create a pretty bow!).
Embossed underskirt design – using the scalloped edge, press gently into the icing to create a ‘wavy’ design.
Flowing ribbons – use the plain curved edge to cut out thin strips. Add detail with a quilting tool.
.The Bodice, Arms And Neck
Choose your colours for the bodice, arms and neck and colour the icing to suit. Cut out a neck and two arms in flesh coloured icing, then cut out the bodice shape in your colour of choice.

The arms can be positioned both facing down, both facing up, or one facing up and one facing down!
The bodice can be decorated with:
- Cut out decorative shapes using flowers, hearts, bows or even a crown shape turned upside down
- Sleeves which can be cut out using many of the decorative shapes including the bow, heart and face cutter (cut in half lengthways)
- A quilting tool rolled over the icing
- Overlapped icing cut out using the bodice cutter (cut in half lengthways)
.Face And Hair
Use the face cutter and your chosen flesh colour to create the head, then use edible ink pens or a fine paint brush and food colouring to add facial features. A handy tip is to practise the facial features on a piece of paper first!
The hair can be cut out using various shapes depending on how you want your princess to look. Colour the icing to suit, then use:
- The scalloped edge and flower cutter to cut out long curly hair
- The face cutter with sections cut away and circle cutter to create hair that is up in a bun
- The face cutter with thin sections cut away and circle cutter to create a hair design that lightly curls around the face and has a side bun
- The crown cutter to add a tiara
.Legs
Legs and feet can be cut out using the arm shape and attached under the skirt.
Building Your Princesses And Embellishing The Cake
Your princess can be made straight onto the cake or cut out and attached to an icing plaque. Start with the skirt then position and attach the bodice, arms, neck and head, decorating as you go!

You can then embellish the cake with cut out flowers and stars …

… hearts, sprinkles, sparkles and a magic wand …

… flowers, leaves and pearls. So why not have a go and get creative!.
Happy Baking!
The Cake Craft Creative Team
Cake Craft World, discover the possibilities
