Celebrate special occasions and birthdays with these amazing number and letter cakes that look like balloons!
In this tutorial you will learn how to neatly cut out the number and letter shapes, cover them in icing to look like balloons and add a sparkly sheen so they look the real thing!
You will need:
Edibles:
1.5kg Sattina Golden Delight Madeira cake
500g Sattina Blush Pink sugarpaste
500g Sattina Cerise Pink sugarpaste
500g Sattina Sunshine Yellow sugarpaste
500g Sattina Regal Purple sugarpaste
700g Tub Sattina Vanilla frosting
Sattina Bright Rainbow Funfetti sugar strands
Sugarflair Claret Wine edible lustre dust
Sugarflair Purple Sparkle edible lustre dust
Claire Bowman Rose Pink Edible Glitter Spray Pump, Non Aerosol
Sugarflair Powder Puff Finishing Sparkle Non-Aerosol Spray – Light Silver
Sugarflair Powder Puff Finishing Sparkle Non-Aerosol Spray – Gold
Edible glue
Equipment:
8” Square Tin
18” x 12″ Rectangular Cake Board
Rolling Pin
Cake Smoother
PME Blade And Shell Tool or Dresden And Veining Tool
Metallic Curling Ribbon
Brush
Palette Knife
Small Flower Pick
.
Step 1. Jazz Up Your Cake Board!
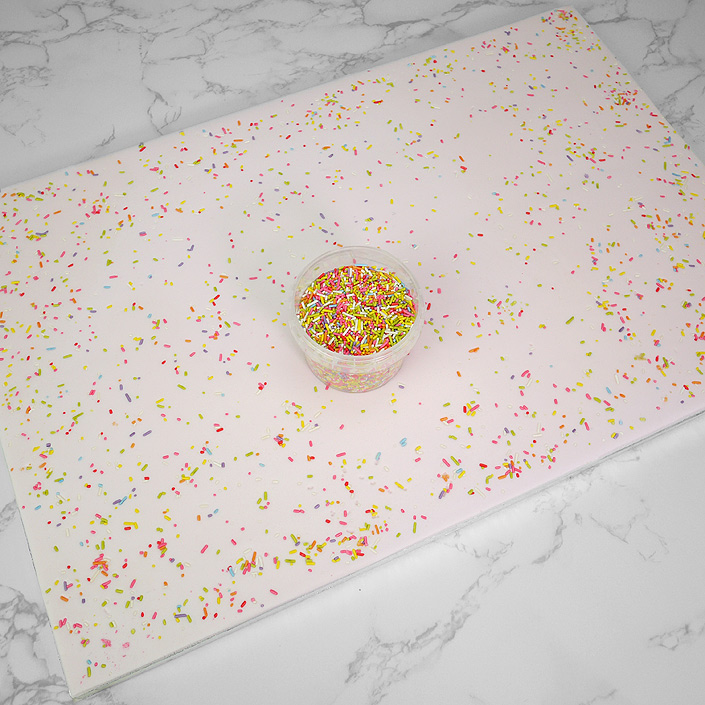
To do this, choose a pale coloured icing like Sattina blush pink sugarpaste, knead until soft and pliable and roll out on your worktop large enough to cover the board. Brush the board with edible glue or cooled boiled water, then carefully lift the icing onto it and smooth over with a cake smoother. Sprinkle with the multi-coloured sugar strands and roll over once with the rolling pin so that they stay firmly in place. Cut excess icing off around the edge of the board with a knife or palette knife.
Handy Tips
To get a neat edge around the side of your cake board, smooth at an angle with a cake smoother or the palm of your hands and attach a ribbon with double-sided tape.
Sprinkle your worktop and hands lightly with icing sugar before you start to stop the icing sticking.
.
Step 2. Achieving Perfectly Shaped Cakes
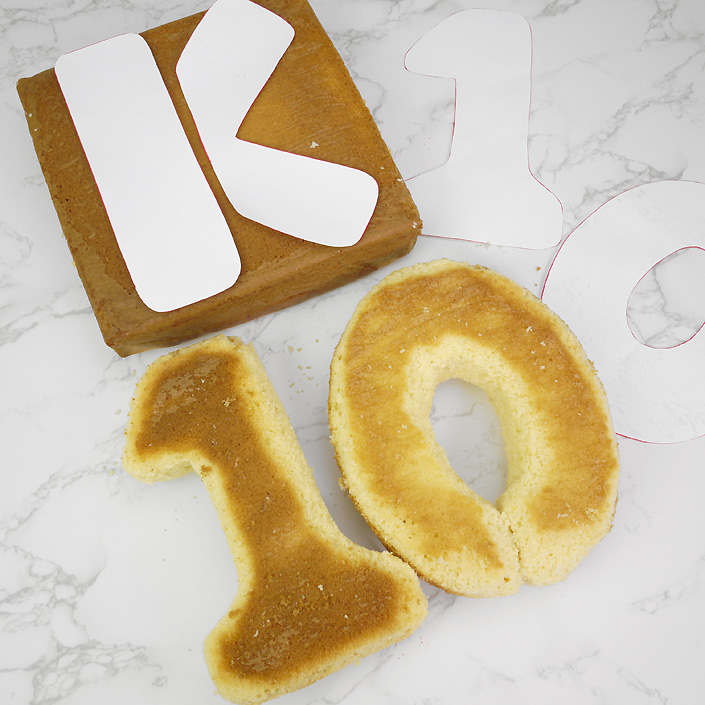 Decide on the size you want your cakes to be then draw a template for each one on greaseproof paper and cut out; our cakes were approximately 7.5” tall so we used an 8” square tin to bake each cake. We used 500g Sattina golden delight Madeira cake mix in each tin which makes a delicious, firm cake which is easy to carve. Place the templates on top of each cake and cut around using a small sharp knife. To create the curve of a balloon, cut away at an angle around the outside and inside edge of each number and letter cake.
.
Step 3. Adding A Coat Of Frosting
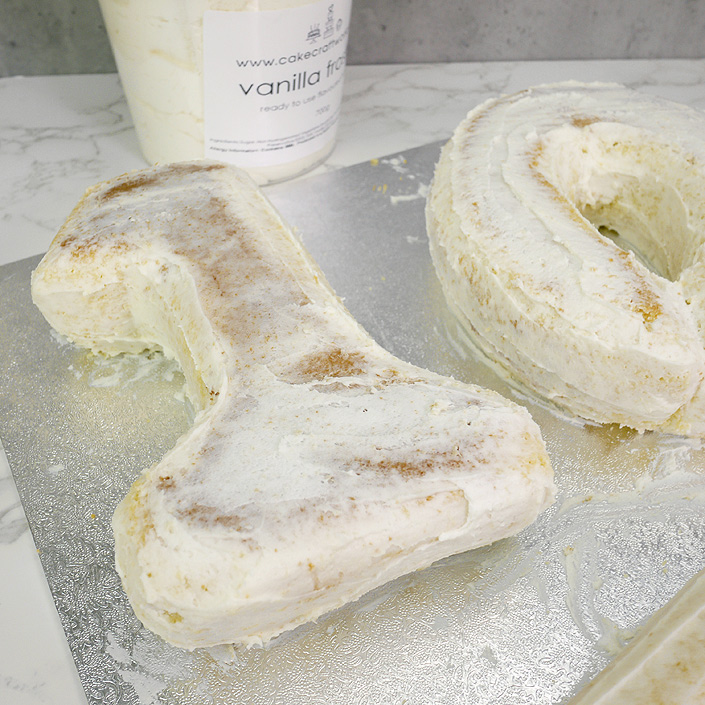 Coat each cake in frosting on your worktop or a separate board using a palette knife. If you want extra flavour, you can slice each cake and add a layer of your favourite jam too.
Handy Tip
We used Sattina frosting which is available in a range of delicious flavours. Because it is oil based, it does not have to be refrigerated like buttercream and Swiss meringue buttercream, sometimes a problem in warm weather if your cake is large!
.
Step 4. Covering In Sugarpaste
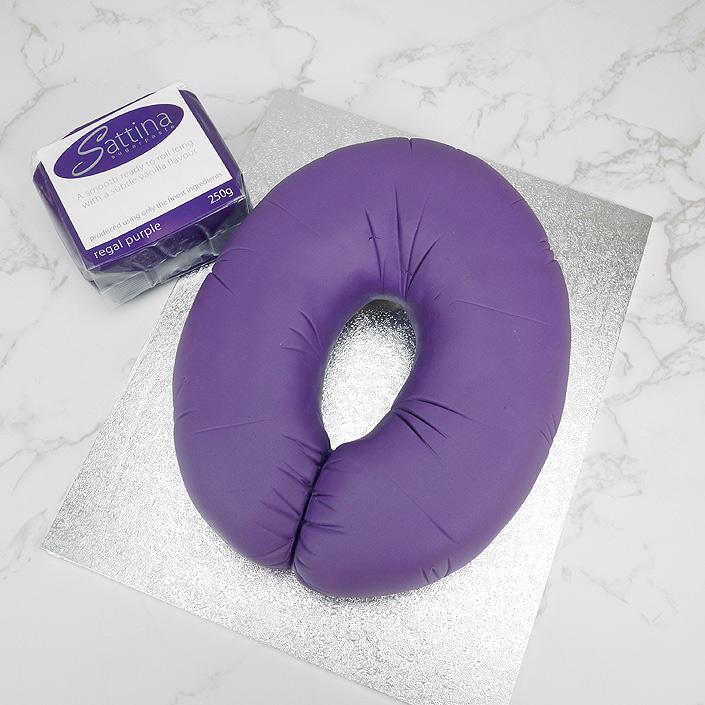
Cover each cake in coloured sugarpaste, again on your worktop or a separate board. Smooth over with a cake smoother, cut off any excess icing around the base and use the cake smoother to push and tuck the icing tightly under the bottom edge of the cake. When the letter or number is a complicated shape like the ‘K’ – make it in separate sections which can then be pushed together.
.
Step 5. Decorating Your Balloon Cakes
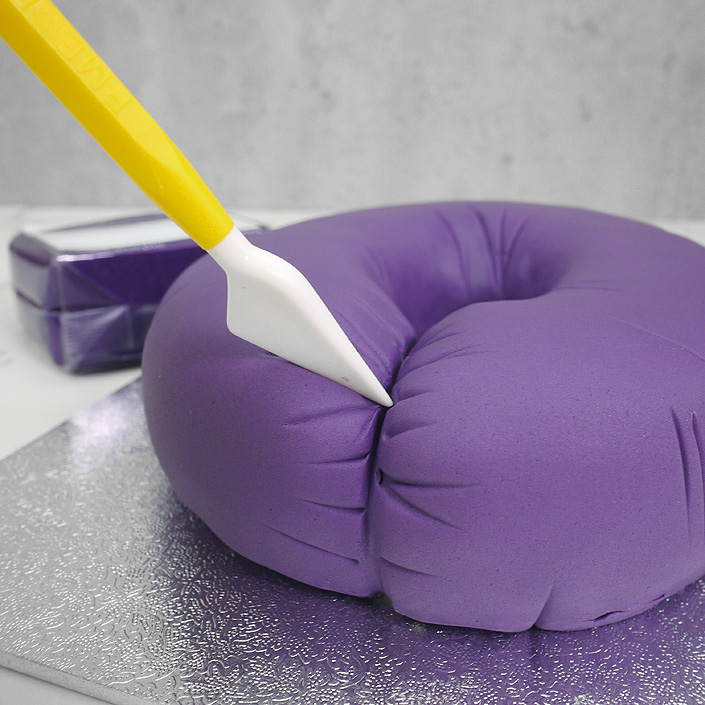
It’s easier to decorate each cake before you position them onto the decorated cake board. Using a blade tool, press small lines into the icing of each cake to resemble balloons; it helps to look at some online images of real number and letter balloons!

Roll the same coloured sugarpaste into long narrow sausages and attach around the side of each cake with edible glue. With your blade tool, mark all the way around to look like the join on a balloon (as shown).
Handy Tips
If you do not have a blade or Dresden tool, use the end of a paint brush, back of a knife or cocktail stick.
.
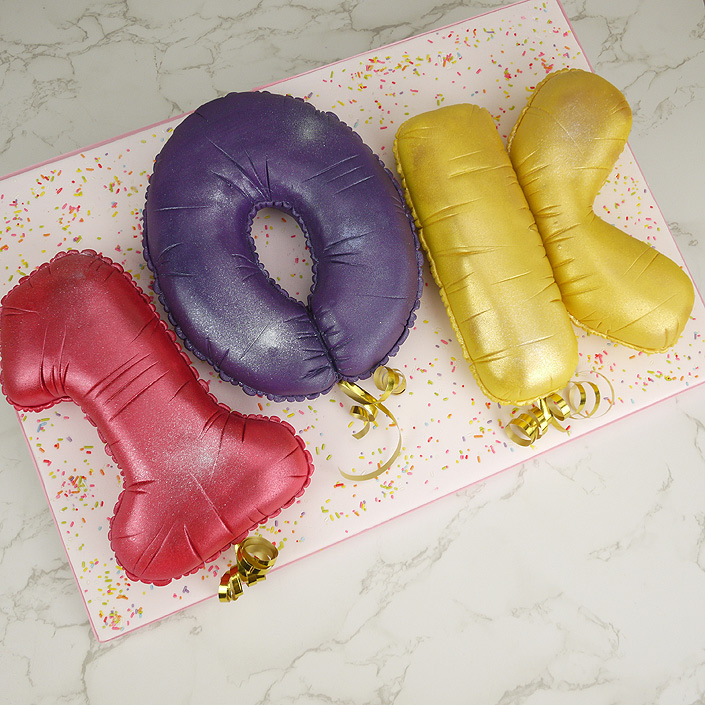
Step 6. Adding A Sparkly Sheen
With a large soft brush, brush each cake with an edible lustre dust in a colour that matches the icing, then spritz with an edible glitter spray or finishing sparkle.
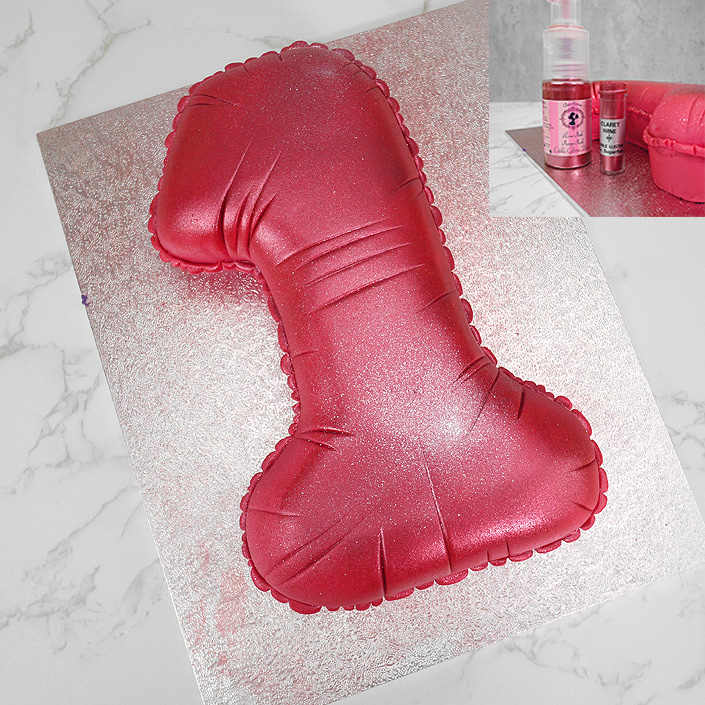
On this cerise pink cake, we used claret wine lustre dust and rose pink edible glitter dust spray,
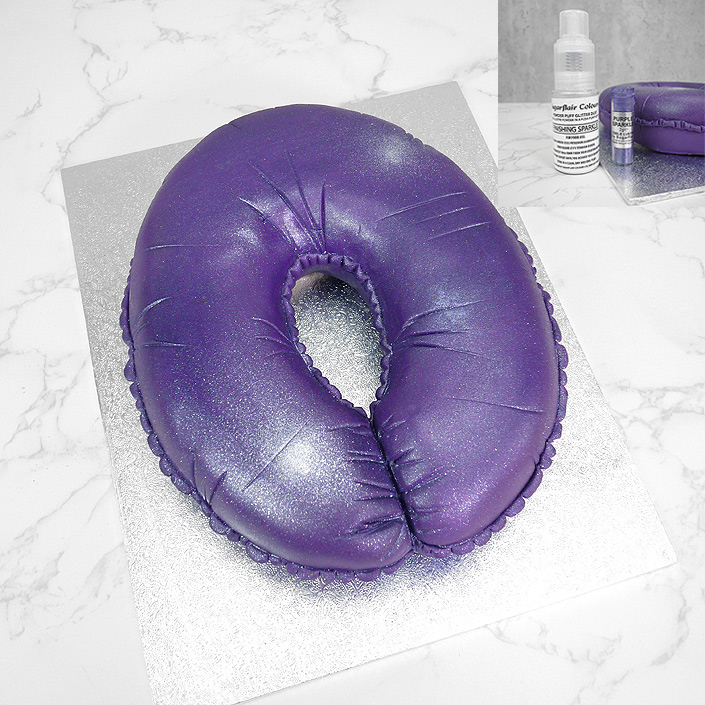
on the regal purple cake, we used purple sparkle lustre dust and light silver finishing sparkle which gives a silver glitter effect,
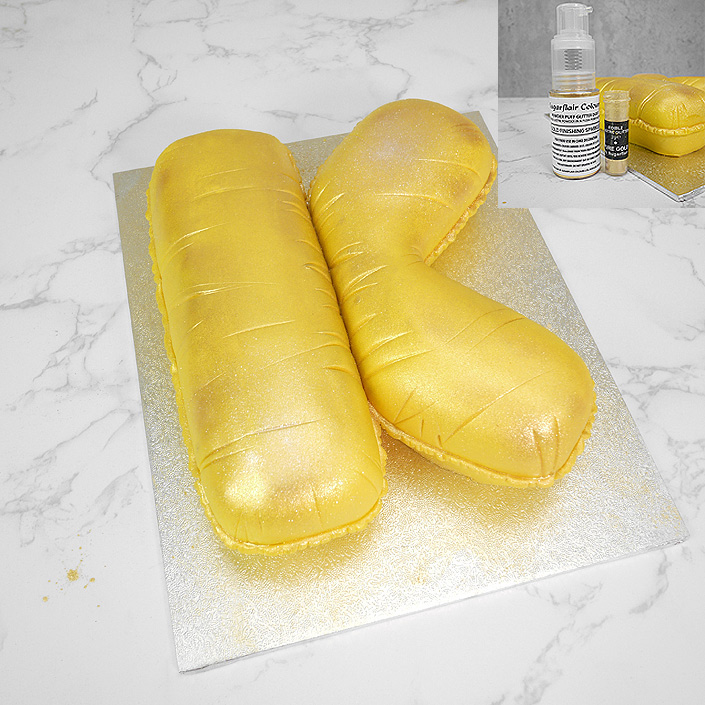
and on the sunshine yellow cake, we used pure gold lustre dust and gold finishing sparkle.
.
Step 7. Finishing Touch!
Now, carefully lift each cake onto the decorated board and attach with frosting. Finally, you cannot have a balloon without a ribbon!
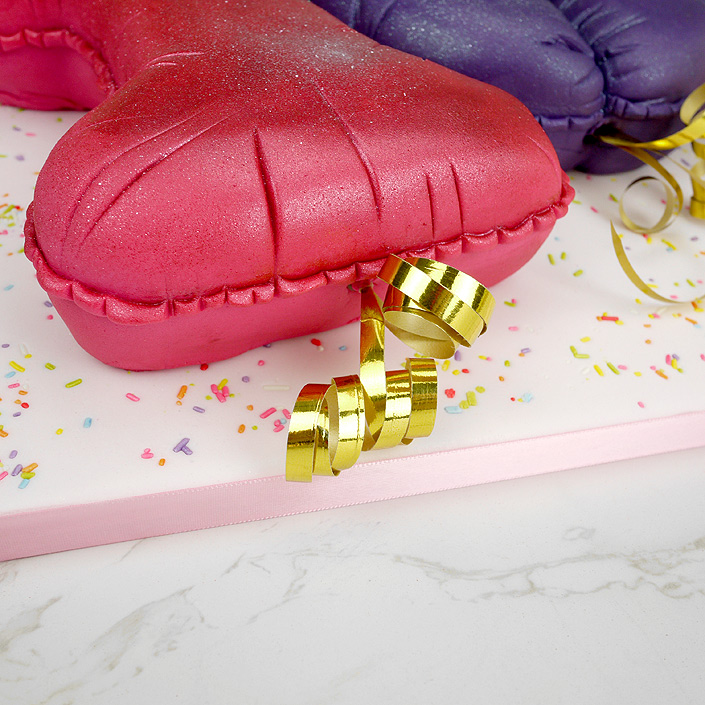
Cut a small length of metallic curling ribbon which matches the colour of your cake and curl it by running a palette knife firmly along its length. Fold in half and push into a small flower pick which can then be pushed into the bottom of the cake.
.
Have fun creating these fun cakes to match in with your celebration decorations and themes and don’t forget, we love seeing what you have all been up to, so please don’t forget to share your cakes and bakes with us on social media.
.
Happy Baking!
Cake Craft Creative Team
.
Cake Craft World, our ideas, your creations