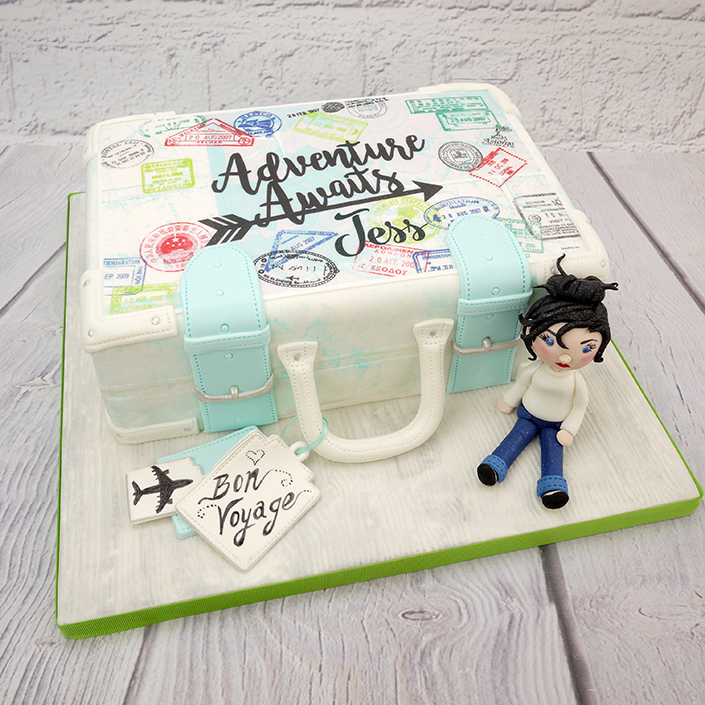
PhotoCake has such a large range of images to choose from that it has really enabled us to come up with some fabulous cake designs which are within the grasp of the home baker! This time we have used the PhotoCake edible icing sheet ‘Adventure Awaits’ to create this travelling case, perfect for anyone heading off to travel the world! You can order the A4 edible icing printed topper sheet with no message or personalise one.
.
We Used:
Edibles
Golden Delight Madeira cake mix
Summer Sattina white sugarpaste
Sugarflair shadow grey paste food colouring
Sugarflair sky blue paste food colouring
Sugarflair royal blue paste food colouring
Sugarflair skintone food colouring paste
Sugarflair white blossom tint food colouring
Sugarflair dusky pink blossom tint food colouring
Sugarflair edible Snowflake lustre dust
Squires edible Silver metallic lustre dust
Sattina 3 in 1 modelling paste
Sattina pitch black sugarpaste 100g
PhotoCake ‘Adventure Awaits’ printed edible icing sheet (8.5 x 11 Inch)
Rainbow Dust blue edible ink pen
Rainbow Dust black edible ink pen
Rainbow Dust red edible ink pen
.
Equipment
9″ and 16″ non stick rolling pin
Sharp scissors
Small & medium brush, Craft knife
Kitchen towel used for background texture
.
.
Step One: Decorating The Board

Decorating the cake board always adds an extra dimension to the cake! Cover a 14” square cake board in 400g of white sugarpaste then place the PME wood embossing sheet onto it and press firmly down. Lift away the texture sheet to reveal the wood effect on the icing and repeat this process until all the iced board is completely embossed. Once dry paint over lightly with a colour wash of cooled boiled water mixed with a little shadow grey paste colouring and white powder colouring. Painting some areas of the board in lighter and darker shades will give a more realistic effect.
.
.
Step Two: Covering & Painting The Cake

The cake needs to be the same size as the PhotoCake edible print, (approximately 9” x 12” – the size of an A4 sheet of paper) but trim your cake accordingly when you have received the topper through the post! Layer and coat your cake with frosting, then cover with white sugarpaste. If the weather is warm, use summer Sattina sugarpaste to make covering even easier! Make a colour wash by mixing a little sky blue paste colouring and white powder colouring with some water then scrunch up some kitchen paper, dip it into the paint and dab all over the cake.
.
.
Step Three: Attaching The PhotoCake Edible Image

Take the PhotoCake ‘Adventure Awaits’ edible print out of its packaging and cut out the image. Peel the backing off and attach to the cake with a little edible glue. Once dry, lift and attach the cake to the textured board with a dab of royal icing and you are ready to start making the details.
.
.
Step Four: Adding Features To The Cake

Before adding any features to the cake, use the PME designer tool with the stitching head attached to mark some stitching around the side of the case. Use modelling paste to make the case handle, marking it with the stitching tool and use a No 3 or 4 plain piping tube to indent two small circles either end. Leave overnight to dry before attaching to the front of the cake with royal icing.
Make four ‘L’ shaped corner pieces for the top of the case and four straight pieces for the bottom corners of the case, marking them around the edge with the stitching tool and with a No 3 or No 4 tube as shown. Attach to the cake straight away with a little edible glue.
To make the case straps, colour white modelling paste with a little sky blue colouring then roll out quite thinly and cut out two strips, curving one end of each strip using a cutting wheel. Mark with the stitching tool and emboss the buckle holes with a No 3 or 4 piping tube. Now attach the straps to the cake immediately so that they curve easily over the front of the cake without drying. Cut out two smaller blue strips and attach to the front on each strap and finally shape thin sausages of modelling paste to make the buckles. Attach to the straps and paint with silver lustre colour mixed with a few drops of rejuvenator spirit.
.
.
Step Five: The Luggage Labels


Cut out two or three luggage labels using Sattina 3 in 1 modelling paste and the FMM gift tag cutters. Mark the shape of the tag with the stitching tool and use the No 3 or No 4 tube to cut tiny holes and leave to dry.
When dry you can easily write a message or draw a picture using a black edible ink pen. Attach to the cake with 3mm ribbon and a little edible glue.
.
.
Step Six: Modelling The Girl’s Body

Use white modelling paste to make the body and arms, keeping to three simple shapes as shown. To make the legs, colour 125g of Sattina 3 in 1 modelling paste with Sugarflair royal blue food colouring. Follow the simple shapes using the stitching tool to mark stitches on the jeans. Mix enough white modelling paste and add Sugarflair skintone food colouring to make the hands, feet and head.
.
.
Step Seven: Girl’s Head & Finishing Touches


Firm up a little black sugarpaste (enough for the shoes and hair) with CMC Sugarcel powder. Cut out two small circles and wrap them around the feet to create shoes. Attach the legs to the cake board followed by the body and arms, hands and feet.
To make the head, take a cake pop stick and cut it to the correct length – no higher than the model. Roll the flesh coloured modelling paste into a ball and push onto the cake pop stick, attaching with edible glue and then attach a small strip around the base to create a neck and leave to partially dry. Push two small pearl balls into the icing for eyes, colour blue and draw on the eye lashes and eye brows with edible ink pens. Add a tiny nose and ears, then paint or draw on red lips with edible paint or an icing pen and add rosy cheeks by brushing over with pink edible powder colour.
To make the hair, cut out a circle as shown, mark with a small knife and glue into place. Make a hair bun and cut and model extra strips of icing to create strands of hair. Lastly, push the cake pop stick through the body, securing with edible glue so that the model will not move.
.
Handy Hint
Use a cornflour pouch when modelling to prevent your icing or hands getting sticky. To create a subtle sparkle over the jeans and hair, spritz with silver edible glitter.